• Bloglovin
  • Email
  • Facebook
  • Instagram
  • Pinterest
  • Skip to primary navigation
  • Skip to main content
  • Skip to primary sidebar
  • Skip to footer
  • Home
  • Skirts
  • Tops
  • Pants
  • Coats
  • Hats
  • Q&A
  • Sewing Tips

C Sews

Welcome to my sewing blog, where you'll find tips, patterns, fabric, fashion, and hats!

  • Home
  • Skirts
  • Tops
  • Dresses
  • Pants
  • Coats
  • Hats
  • Q&A
  • Sewing Tips
    • Bloglovin
    • Email
    • Facebook
    • Instagram
    • Pinterest

My Spring for Cotton Dress – Construction Details

May 3, 2015 By Chuleenan 9 Comments

Hi,

I hope you’re enjoying some spring sewing! Have you sewed any eyelet fabric? If you have any tips, please pass them on. This was my first experience sewing with it.

A few days ago, I finished the dress I made for Lucky Lucille’s Spring for Cotton sewalong. The challenge was to make something from a vintage or vintage-inspired pattern using 100 percent cotton fabric. I went through my small stash of vintage patterns decided to make a sleeveless dress. This pattern was for a 36 bust, 28 waist, and 38 hips. I added a lining to my version.

Simplicity 2439 - vintage sewing pattern - csews.com

My waist and hips are bigger than the pattern (especially because I’ve gained about ten pounds since last year – the result of a busy job and not making time to exercise). My waist is about 30.5 inches (77.5 cm) and my hips 41 inches (104 cm). I made most of my adjustments before I cut my muslin, which you can read about in my post WIP: a Vintage Dress Pattern and Japanese Top. Here’s my brief summary of the flat pattern adjustments before I made my muslin:

  • 1/4″ small bust adjustment,
  • dropped armhole 1 inch,
  • added 1/2 inch (1.3 cm) to side seams of front and back bodice (total of 2 inches),
  • added 1/2 inch to skirt waist
  • added 3/4 inch to hip area.

Here’s what my muslin looked like (pardon the bad bathroom lighting). I decided to leave off the pocket detail because I didn’t really like it on me. They were decorative anyway, not actual pockets.

Muslin of dress - spring for cotton - csews.com

At first glance it looked like it fit quite well and I thought, great, now I can cut my fashion fabric. But when I turned around and looked at the back, I could see that there was a little gaping of the back neckline, which is a bit of a scoop neck that’s lower than the front neckline. Hmmmm. I had not encountered this issue before. But I hadn’t made a dress with a scoop back neckline either.

So I went online to see what pattern adjustment to make – and stumbled across Ginger Makes post: By Hand London Anna Dress: Back Neckline Adjustment. I don’t have narrow shoulders so this was the first-time pattern adjustment for me. Before I did anything to my pattern, I took off my muslin, pinched in where I thought most of the gaping occurred, then pinned it in pace with safety pins. I guess that 1/4-inch (slightly less than 1 cm) would do the trick.

1/4 inch back neckline adjustment - csews.com

Back bodice – pinned.
Bodice - back adjustment muslin - csews.com

I tried it on again and it looked good (sorry I didn’t take a photo of that), so I decided to skip making another muslin. I made a 1/4″ flat pattern adjustment, following Ginger Makes’ clear instructions. It was easy – just draw a line from the armhole to the area that gapes the most, cut along that line and overlap 1/4″. The point turner is where I sliced the pattern and overlapped it 1/4 inch. to see a larger version of this photo, click on it once and it will open another window, then click on the photo again, you’ll see a large version.

Back neckline adjustment - Simplicity 2439 vintage sewing pattern - csews.com

Then I did a bit of a reality check, tried on the muslin one last time and realized that the waist needed a little more ease. So I added another 1/4-inch (.6 cm) to the waist of the bodice and skirt, crossed my fingers, and began cutting my fashion fabric.

Meanwhile, I also did a muslin of the jacket but decided I didn’t like the boxy shape. So I didn’t make it.

Jacket - vintage Simplicity 2439 - Spring for cotton - csews.com

The challenge of making this dress is that I was using eyelet fabric for the first time and lining the entire dress with a contrast fabric. Here’s an image I posted on Instagram when I was shopping for my fabric at Stonemountain & Daughter Fabrics for this dress.

Eyelet fabric with fuschia - csews.com

I chose the hot pink fabric for the color – more like a fuchsia – rather than its weight, which was quilt weight. I didn’t think it would make the dress layers too thick because the eyelet fabric was lightweight and had a bit of drape to it. So I thought they would balance each other out. As a general rule though, it’s better to match the drape/weight of the fabrics you’re sewing together. In retrospect, it would have been better to choose a lining fabric that was lighter weight as you’ll see below. But the challenge of this sewalong was to use 100 percent cotton and I liked this color so I went with it.

Materials

  • 3 1/2 yards eyelet fabric [amount for dress and jacket, which I didn’t make]
  • 3 yards of lining fabric
  • 1 1/4 yards of 3/4-inch ban-rol waistband interfacing
  • 1-inch buckle kit
  • Gutterman thread
  • Schmetz 60/10 needle

I got my fabric from Stonemountain & Daughter Fabrics in Berkeley, ban-rol from Britex Fabrics (notions floor manager Natalie suggested that I use this for my belt), the buckle kit from Lacis in Berkeley. You can also buy the buckle kit at Lacis’s online store (search “buckle kit”).

As I began sewing this dress, I realized I needed to figure out if I would sew my hot pink lining fabric as lining or underlining. (For a good explanation of underlining, see Seamstress Erin’s post When to Underline your Sewing.) I decided that it would depend on the effect on the eyelet – and how thick the fabric would be. So the bodice was sewn as lining and parts of the skirt were sewn as lining and underlining.

I decided that the darts could all be sewn separately, rather than sewing the lining fabric together with the fashion fabric. so I sewed the all the darts first. Four in the front bodice…

vintage Simplicity 2439 - Bodice - front lining - csews.com

two in the back bodice…

vintage Simplicity 2439 back bodice - csews.com

and four in the skirt back. This is one side of the skirt back, which has a center seam and kick pleat.

vintage Simplicity 2439 - back skirt darts - csews.com

I also got a nice tip via Instagram from @sewbrooke, who blogs at Custom Style. She told me if the fabric seemed thick, I could press the darts one way for the lining and another way for the fashion fabric to take care of any bulk. I took her advice.

The directions called for cutting the darts and pressing them open, which I had not seen before. I posted that photo on my IG feed (@csews) and asked if I needed to do this. Brooke said that this is often done in menswear and more necessary with a suiting or wool fabric. So I just pressed my darts.

Dart instructions - csews.com

However, the pleats in the front needed to be sewn with both fabrics sandwiched together. Otherwise, you wouldn’t see any of the pink through the eyelet.

As you can see here, the darts are slim enough that you don’t really notice that there isn’t any pink behind them. The pleats are a bit thick – something I hadn’t thought about when I bought my lining fabric. (I forgot to make a loop to hold down the end of the belt but I did make one the next day so I had it on when I wore the dress to work on Friday. It doesn’t stick out anymore.)

Spring for cottonn - Simplicity 2439 dress front detail - csews.com

I sewed my bodice pieces, following the instructions in How to Line a Sleeveless Dress from Blithe Stitches, a tutorial I used when I made a dress a couple of years ago. This dress has a side zipper. I left open the area just below the left armhole.

The skirt got a little tricky. I had to figure out how to sew the kick pleat in the back with the lining. The instructions direct you to first sew the two back skirt pieces together with  5/8″ seam allowance, and then sew the center back seam, which is about three inches in from the other seam. You then fold over this three-inch bit of fabric to one side and sew it together when you attach the bodice to the skirt. This center back seam runs about 2/3 of the skirt length. The area below the center back seam forms the kick pleat. I improvised as I figured out how to sew the kick pleat with the eyelet and lining fabrics. (I cut my eyelet fabric perpendicular to the grain so I could use the scalloped edge of the selvage as my hem. The dress hem is a straight edge, not a curved one, which makes it possible to do this.)

instructions - kick pleat - csews.com

I skipped the first seam with the 5/8″ seam allowance and just sewed the center back seam, leaving the area below the pattern mark open.

Skirt back - kick pleat - csews.com

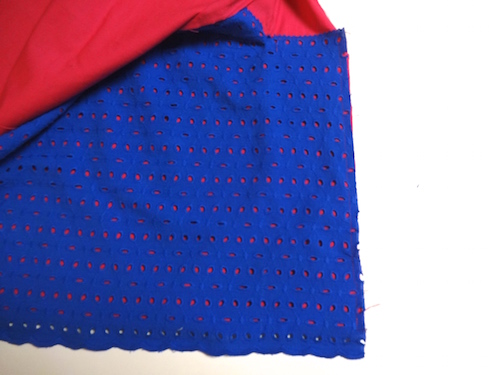
Then I sewed the center back seam of the eyelet fabric and pinned it to the waist of the lining fabric. Clearly, the dress would be too thick around the waist – six layers of fabric (kick pleat adds another two layers) – so I cut the fashion fabric above the pleat with my pinking scissors, close to the seam line. I didn’t trim the lining fabric.

Kick pleat - eyelet fabric - csews.com

Then I placed the lining fabric on top of the eyelet fabric and sewed the 5/8″ seam. Here’s a detail of the kick pleat before sewing the 5/8″ seam.

Kick pleat sewn

After I finished sewing the kick pleat, I was ready to sew the skirt side seams. I sewed the lining and the eyelet fabric together at the side seams. It was hard to line up the eyelet across the seam. I began at the bottom so I would be sure that the eyelet lined up at that scalloped edge. I pinned and eased as much as possible but it was all slightly off on the side seams. I decided to let that go and not get stressed out about it. I’m not sure what made it tricky – maybe because I cut the fabric against the grain or that the embroidery of the eyelet distorts the fabric slightly so things are slightly off? I didn’t use any stabilizer so maybe that would have helped.

Here’s what it looks like completed.  The seam in the center is that 5/8″ seam I mentioned above.

Kick pleat completed - csews.com

But you really don’t see that seam in the back pleat. Without the pleat, I’m sure I wouldn’t be able to walk in this dress.

Spring for cotton - vintage Simplicity 2439 - csews.com

I attached the bodice to the skirt (note the zipper tape on the right). The waist seam is really thick – four layers of fabric and even more where the front pleats are. If I had to do this again, I would have picked a much lighter weight lining fabric. And I would add more ease in the hips. It’s not that it’s tight there but when I sit down, there’s small pool of fabric in my lap, which doesn’t look very good.

Waist seam - inside - csews.com

And here’s another photo of the finished dress!

Spring for cotton - vintage Simplicity 2439 dress pattern - csews.com

I really love the colors! I think I’ll do another post on accessories for this dress – the belt and fascinator. I was going to include info on making the belt and fascinator but it’s getting really long so I’ll save that for another day! Thanks for visiting and happy sewing!

Follow on Bloglovin follow us in feedly

Like this:

Like Loading…

Related


Filed Under: Dresses, Sewalong Tagged With: Britex Fabrics, cotton fabric, Lacis, Lucky Lucille, sewalong, Spring for Cotton, Stonemountain & Daughter Fabrics

Reader Interactions

Comments

  1. laurahoj says

    May 6, 2015 at 9:55 am

    This is so beautiful. The pink with the blue is perfect!

    Loading...
    Reply
    • Chuleenan says

      May 6, 2015 at 2:39 pm

      Thank you! I used to avoid pink but turns out I like bright pink – at least in small amounts. No pastels for me. 😉

      Loading...
      Reply
  2. seamsoddlouise says

    May 5, 2015 at 3:01 pm

    Great tip to press the darts in different directions I will try to remember that one! You have done a fantastic job, I would not have thought to put those colours and fabrics together and it looks brilliant. Well done.

    Loading...
    Reply
    • Chuleenan says

      May 6, 2015 at 2:37 pm

      Thank you so much! I recommend following Brooke’s IG feed for sewing tips. She’s also generous with advice when you post a question. I had been seeing a lot of eyelet lately so I wanted to try sewing with it. And I liked the idea of using a bright contrasting color behind it. 🙂

      Loading...
      Reply
  3. Brooke says

    May 4, 2015 at 9:33 am

    I love it! It turned out so well! The vertical eyelet on the bodice and the horizontal eyelet on the skirt adds some nice subtle visual interest.

    Eyelet is always a little tricky to sew because of the embroidered bulk around the holes but everything looks great how you did it! And the hot pink is beautiful with the cobalt blue!

    Loading...
    Reply
    • Chuleenan says

      May 4, 2015 at 9:40 pm

      Thank you! I really didn’t think about what sewing issues might come up until I began sewing. You’re right about the embroidered bulk around the holes! I feel lucky that it worked out. There’s maybe one dart in the back skirt that sticks out a teeny bit at the point because of the embroidery. But I don’t think anyone will notice. 😉

      I’m really happy with the colors! Glad you like them, too.

      Loading...
      Reply
  4. vivian says

    May 4, 2015 at 5:16 am

    Beautiful job, I love the colors. You did the kick pleat very well, I find them a bit of a pain. I might have to try your method.

    Loading...
    Reply
    • Chuleenan says

      May 4, 2015 at 9:35 pm

      Thank you! I made another dress from a vintage pattern a few years ago that didn’t use the entire length of the skirt for the kick pleat. It does seem like a bit of unnecessary fabric above the pleat.

      Loading...
      Reply

Comments, tips, or suggestions? I'd love to hear from you!Cancel reply

This site uses Akismet to reduce spam. Learn how your comment data is processed.

Primary Sidebar

I love sewing, fabric, and hats and meeting people who sew! I've been blogging since 2011 and organizing monthly sewing meetups since 2014.

Join My List

POPULAR POSTS

Illustration of nine women of different height, skin, and hair color wearing black swimsuits on chartreuse backgrouns with words 2025 Sewing Pattern Height Chart at the bottom

Sewing pattern height – a chart – 2025 update

My tenth blogversary!

Black woman with glasses and dreadlocks wearing ivory sweater

Q&A with Olgalyn of O! Jolly! + sweater knit kit winner!

Basic Black book cover

Basic Black Book Review and Giveaway!

Search

ARCHIVES

CATEGORIES

Footer

join my list

join my list
Day 31 of Me Made May - almost didn’t post today! Day 31 of Me Made May - almost didn’t post today!
🤪
This is my striped Fibre Mood Quilla top and Merchant and Mills Juno pants paired with Papercut Patterns Nova Coat, which I got at a Bay Area Sewists handmade garment swap a year or so ago. Thank you @lozenq! 
💜
Almost posted every day!
🤗
#MeMadeMay2026
Here’s what I wore on Day 27 on Me Made May - and Here’s what I wore on Day 27 on Me Made May - and part of what I wore yesterday.
😀
This is one of my earlier Cuff Tops, cropped with a round neck worn with Free Range Slacks (on repeat). Print was from @stonemountainfabric and the Brussels washer linen was from 
@harts_fabric 
🖤
On Day 28, I wore a Toaster Sweater during the day and then wore my yellow Dew Dress to a jazz concert. I just snapped a selfie on public transport. The last two pix are from when I first made the Dew Dress.
💛
In the office today - and wearing one of my favori In the office today - and wearing one of my favorite tops on Day 26 of Me Made May!
💙
I think I used a dress pattern from a Nani Iro sewing book but made it into this top with split seam. I wanted to use all of the fabric so I made it as long as possible.
💙
The Nani Iro double gauze fabric and the corduroyJuno pants - and the quilted fabric in the second photo are from @stonemountainfabric 
🖤
Cap is self-drafted.

#MeMadeMay2026 #HandmadeWardrobe
I added elastic to the sleeves of my Array Dress - I added elastic to the sleeves of my Array Dress - which I’m wearing again, wore it on Day 14.
💙
On that photo you’ll see the sleeves without elastic. I think I’ll wear it more often now. I forgot about taking photos today so I just did a photo of the sleeve.
😆
Happy Me Made May Day 25!
🤸🏾

#MeMadeMay2026
Hey - it’s Day 24 of Me Made May! 🤸🏾 Finally gett Hey - it’s Day 24 of Me Made May! 
🤸🏾
Finally getting to the last week - can’t believe I’ve posted everyday. 
😆 
Today I’m wearing the Anna Allen Anthea blouse in a deep rose Japanese lawn from @stonemountainfabric - sleeves in a Liberty lawn from a Bay Area Sewists meetup - and Merchant and Mills Juno culottes in pinwhale corduroy also from Stonemountain a few years ago.
🖤
Cap is self-drafted in a wool tweed.

#MeMadeMay2026
This waffle knit fabric was in my stash for years This waffle knit fabric was in my stash for years until I made the Viola Vest earlier this year.
🖤
I had some fabric leftover so I experimented and made a Cuff Top with a round neck, finishing the neckline with ribbing. I didn’t have enough fabric to make the sleeves any longer than this. So I used narrow elastic but the fabric is a bit thick so it didn’t contract, which I hadn’t taken into account.
🤷🏽‍♀️
I did match the stripes at the side seams - you can kinda see that second photo. I’m happy with the matching but still not sure I like this top. It’s weekend wear for now.
🤸🏾
Wearing my Sew House Seven Free Range Slacks in linen - patched because I’ve worn them out. 
🖤
Day 23 of #MeMaday2026
It got cloudy and cool by the time I took this pho It got cloudy and cool by the time I took this photo today - Day 22 of Me Made May!
🌥️
But it had been sunny earlier! I was working from home today and got dressed to run some errands.
🏃🏾‍♀️
This the  Matchy Matchy’s Skipper Top and my old Megan Nielsen Flint Pants. The top uses scraps from other projects - all fabric except the center bottom piece (Liberty from a Bay Area Sewists meetup) are from @stonemountainfabric 
♥️
You’ll see some of these fabrics in the coming days. I can’t believe we getting to the final week of #MeMadeMay2026 !
Back in the office today - Day 21 of Me Made May! Back in the office today - Day 21 of Me Made May!
🤸🏾
Yes, I’m wearing another Cuff Top but with a new combination! I’ve never paired it with this particular Just Patterns Lara Skirt before. I’ve worn it with my orange Lara Skirt, but not this Japanese indigo skirt. 
💙
I’ve made so many Cuff Toos because I can squeeze a size medium on about 1 yard or meter of fabric by cropping the length of the body. I like lengthening the sleeves, too, which I did here. I cut the front/back on the fold.
✂️
I made the skirt from Frocktails a few years ago. I made a linen blouse to go with it but I didn’t feel like ironing this morning.
😆

#MeMadeMay2026
It’s my ice cream bar and roses Cuff Top for Day 2 It’s my ice cream bar and roses Cuff Top for Day 20 of Me Made May 2026!
🌹
I got this cotton lawn from Britex Fabrics a while ago. It took a long time for me to sew because the fuchsia was so intense I didn’t know what to make with it.
😆
Then I decided to make another cropped Cuff Top with sleeves extended to selvage. But this is directional fabric and I didn’t want upside down ice cream bars on the back. I didn’t have enough fabric so I found some leftover fuchsia in my stash and used that - sort of a yoke.
🩷
The Patio Palazzo Pants are by @naughtybobbinpatterns - a local designer and Bay Area Sewists Meetup member.
🤗

#MeMadeMay2026
I got tired of wearing my Mimosa Culottes three da I got tired of wearing my Mimosa Culottes three days in a row so I’m wearing my @fridaypatterncompany Dew Dress again on the flight back. (I forgot to pack my other pants. 🙄)
🛫
I made it to Day 19 of Me Made May! I didn’t quite have enough fabric for the bottom part of the dress, which get wider.You can see the sliver of sky on my left (right side of photo).
🏞️
All the other photos are of my afternoon at the Art Institute of Chicago - Chagall stained glass, Edward Hopper, Impressionists, amazing pieces in the exhibition “Embroidered Traditions from Morocco to Afghanistan,” Matisse’s Jazz series, a pleated blouse someone was wearing, the ceiling, and The Deluge by El Anatsui.
🎨
I also ran around to see an El Greco painting, exquisite miniature rooms, and an exhibition highlighting 2,000 years of Korean art. Whew!
🏃🏾‍♀️
If you’re ever in Chicago, visit this museum. If you’ve every studied art history, you’ll see many works in the history books at this landmark institution.
📚

#MeMadeMay2026 #HandmadeWardrobe

Copyright © 2026 · C Sews · Blog Design by Little Blue Deer
Privacy Policy

We use cookies on our website to give you the most relevant experience by remembering your preferences and repeat visits. By clicking “Accept,” you consent to the use of all the cookies.
Cookie settingsACCEPT
Manage consent

Privacy Overview

This website uses cookies to improve your experience while you navigate through the website. Out of these, the cookies that are categorized as necessary are stored on your browser as they are essential for the working of basic functionalities of the website. We also use third-party cookies that help us analyze and understand how you use this website. These cookies will be stored in your browser only with your consent. You also have the option to opt-out of these cookies. But opting out of some of these cookies may affect your browsing experience.
Necessary
Always Enabled
Necessary cookies are absolutely essential for the website to function properly. These cookies ensure basic functionalities and security features of the website, anonymously.
CookieDurationDescription
cookielawinfo-checbox-analytics11 monthsThis cookie is set by GDPR Cookie Consent plugin. The cookie is used to store the user consent for the cookies in the category "Analytics".
cookielawinfo-checbox-functional11 monthsThe cookie is set by GDPR cookie consent to record the user consent for the cookies in the category "Functional".
cookielawinfo-checbox-others11 monthsThis cookie is set by GDPR Cookie Consent plugin. The cookie is used to store the user consent for the cookies in the category "Other.
cookielawinfo-checkbox-necessary11 monthsThis cookie is set by GDPR Cookie Consent plugin. The cookies is used to store the user consent for the cookies in the category "Necessary".
cookielawinfo-checkbox-performance11 monthsThis cookie is set by GDPR Cookie Consent plugin. The cookie is used to store the user consent for the cookies in the category "Performance".
viewed_cookie_policy11 monthsThe cookie is set by the GDPR Cookie Consent plugin and is used to store whether or not user has consented to the use of cookies. It does not store any personal data.
Functional
Functional cookies help to perform certain functionalities like sharing the content of the website on social media platforms, collect feedbacks, and other third-party features.
Performance
Performance cookies are used to understand and analyze the key performance indexes of the website which helps in delivering a better user experience for the visitors.
Analytics
Analytical cookies are used to understand how visitors interact with the website. These cookies help provide information on metrics the number of visitors, bounce rate, traffic source, etc.
Advertisement
Advertisement cookies are used to provide visitors with relevant ads and marketing campaigns. These cookies track visitors across websites and collect information to provide customized ads.
Others
Other uncategorized cookies are those that are being analyzed and have not been classified into a category as yet.
SAVE & ACCEPT

Loading Comments...

    %d